Here are few interesting facts about computer we thought you might enjoy knowing. 1. You Cannot create file or folder named “con“
2. The world top companies HP, Microsoft and Apple have one very interesting thing in common – they were all started in a garage. 3. Only around 10% of the world’s currency is physical money, the rest only exists on computers. :O 4. The first ever computer mouse was made of wood. Crazy!
5. Humans blink 20 times a minute, but did you know while using computer we blink only 7 times a minute. Concentration xD.
Having multiple computers in a premises doesn’t mean you have to have printers individually for every computer.
In this post we will show you how to share printer between multiple Computers on the same network.
The first most important thing here is you must be on same network group from each computer, before sharing printer we will learn how to put all your systems in same network and will setup file and printer sharing.
Configuring all computers in same network group
(we will take work group as an example).
1. Go to Start and type Network and Sharing and open Network and Sharing Center.
2. Select Work Network as your network group
a.
b.
Note: All your computers should be on same network group.
Configuring File and Printer Sharing Settings
1. On Network and Sharing Center click on Change Advance Sharing Settings
2. In Advance Sharing Settings Click on the down arrow which will expand Home/Work Profile and Turn on file and Printer Sharing
3. Once done click on Save Changes your are now ready to share your printer.
Sharing a Printer
Click on Start in the bottom left corner of your screen. A popup list will appear.
Click on Devices and Printers, from the popup list.
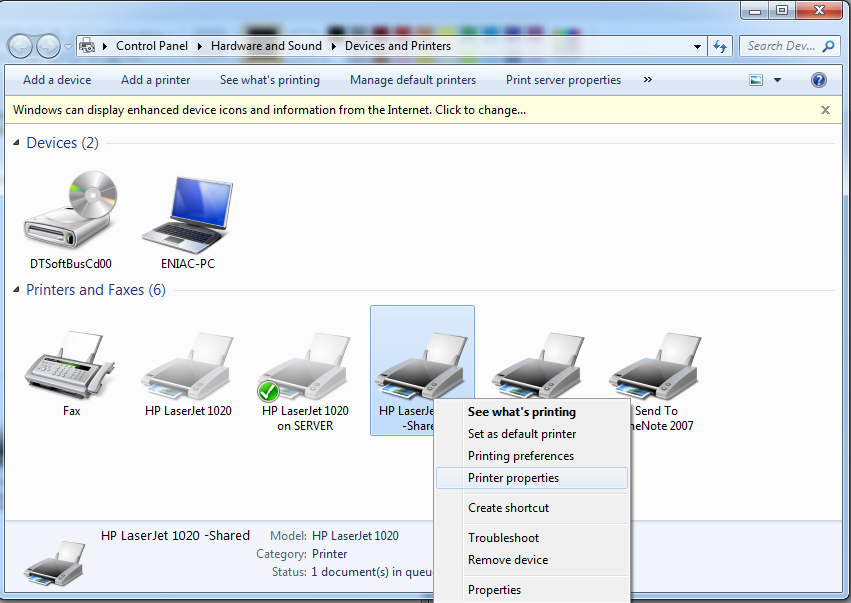
Right click the printer you want to share. A dropdown list will appear.
Select Printer properties from the dropdown list.
Click on the Sharing tab and select the Share this printer check box and press OK.
In order for other people to connect to the printer, they just have to add the network printer that you just opened for sharing to their computers. Here’s how to do this.
Click on Start in the bottom left corner of your screen. Go to Devices and Printers from the popup list.
Select Add a printer.
Click on Add a network, wireless or Bluetooth printer.
Click the shared printer.
Click Next and Continue according to the instructions on the screen.
Hope this helped you, If you have any questions/queries regarding printer sharing leave us a comment below.
1) Run command prompt (cmd). This can be done by clicking start and typing typing cmd in Windows 7. In Windows Xp, click on start and then click on run. Type cmd and run. This will open the command prompt which will look like this:
2) Then run diskpart utility from command prompt, by typing ‘diskpart’ on command prompt and pressing enter. This will run the diskpart utility in a separate windows, which is shown in 2nd picture below:
3) Now put in your pendrive in a USB port. Your pen drive must be atleast 4 GB, 8 GB pendrive is best for this purpose. Now go back to the diskpart console and type ‘listdisk’ and press enter. This will list the various storage devices available. You can see the size column of the disk and here we can see that ‘disk 2′ is our pen drive. Warning: In your computer it may be some other number. In our case it is ‘disk 2′.
4) Then you have to type ‘select disk 2′ and press enter. Note: in our case it is disk 2, in your case it may be disk 3, or disk 1 or any other number. You can enter ‘detail disk’ to see the details of the disk after selecting it to verify that you have selected the correct disk. You can see these steps in the image below:
5) Then you have to run a series of commands. The commands to be run in the order are:- clean
– create partition primary
– select partition 1
– active
– format fs=fat32 quick
These steps are shown in the image below:
Please help us in paying our Server maintenance cost by clicking on the ad below.
6) The format step will take some time. You can have a tea or coffee in the meantime and come back. After the format is complete you have to run ‘assign’ command. And after this you can exit diskpart utility by entering the ‘exit’ command. The steps are shown below:
– assign
– exit
– Check out the video below for more
7) After the format is complete, insert Windows 7 Media in your DVD drive, or if you have an .iso image of the DVD, mount that image using any virtual drive software like Power ISO.
– On My Computer, and open the contents of DVD Drive. Press ‘ctrl+a’ to select all contents and copy all the contents by pressing ‘ctrl+c’.
– Now go back to My Computer and open the USB Drive and press ‘ctrl+v’ to paste all the contents of DVD into the USB Disk.
8) When the copy finishes, you are done just eject the USB Drive and use it to install Windows 7 in your computer/laptop.
We have already resolved this problem in earlier post but what if you do-not have an ISO/CD-DVD to recreate the bootable USB. Note: Assuming you already have a windows 7 bootable USB. Step 1. Download Windows Image tool Click here for the direct download link. Step 2. Extract and run WindowsImageTool.exe
Step 3: Choose None at Source Path, connect your Bootable USB disc to the desktop/Laptop and select it at Destination path.
Step 4: Press Start and you are ready to install 🙂
In some motherboards USB drivers wont work even after installation of windows use DVD drives to install the drivers or in-case you do not have a CD/DVD drive drop us your e-mail ID at comments below.
Starting a blog can be confusing but believe me it is not as complicated as most of us think, you don’t have to be a geek in order to start a blog, all you need is a name the content/story you want to share globally. I would personally recommend Blogger or WordPress to start from, the platforms are free and gives you the flexibility to customize upto an extent.
In-case you have any question, i would love to help, comment section is below xD